iOS App Setup
The Button Merchant Library for iOS is a lightweight, open-source library designed to manage the Button Attribution Token. By the end of this section, you’ll be able to associate all incoming users against their subsequent taps in other applications that brought them to your iOS application.
Add the Merchant Library
Include Dependency
To get started, add the Button Merchant Library through CocoaPods, Carthage or Swift Package Manager.
In Xcode, navigate to **File → Swift Packages → Add Package Dependency**

https://github.com/button/button-merchant-ios
pod 'ButtonMerchant', '~> 1.5'dependencies: [
.package(url: "https://github.com/button/button-merchant-ios", .upToNextMajor(from: "1.5.0"))
]github "button/button-merchant-ios" ~> 1.5
Allow auto-updatingThe Button Merchant Library is strictly semantically versioned so we strongly recommend allowing automatic updates up to the next major version.
Before continuing run pod install, carthage build or allow Swift Package Manager to include the Button Merchant Library, depending on your method of inclusion.
Setup Library
In your AppDelegate file, import ButtonMerchant and initialize it by calling the ButtonMerchant.configure method passing your iOS Application ID registered in the Button Dashboard.
Additionally, some users will be initializing your application from a fresh install after following a promotion. In order to fulfill these specific user requests, include a call to the ButtonMerchant.handlePostInstallURL method. This will fetch the user’s destination url prior to the fresh install, and allow you to route them directly to your relevant promotion. The handlePostInstallURL method will pass a non-nil url to the callback only once, upon first app launch following an install from a Button Link.
import ButtonMerchant

func application(_ application: UIApplication, didFinishLaunchingWithOptions
                 launchOptions: [UIApplicationLaunchOptionsKey: Any]?) -> Bool {
  // Replace app-xxxxxxxxxxxxxxxx with your App ID from the
  // Button Dashboard https://app.usebutton.com
  ButtonMerchant.configure(applicationId: "<#app-xxxxxxxxxxxxxxxx#>")

  ButtonMerchant.handlePostInstallURL { url, error in

		guard let url = url else {
			// If nil is returned, you can exit the callback
      // and route the user as normal
		}
		// Parse the returned URL and redirect
		// the user to the correct destination in your app
	}

  return true
}
@import ButtonMerchant;
- (BOOL)application:(UIApplication *)application
didFinishLaunchingWithOptions:(NSDictionary *)launchOptions {
// Replace app-xxxxxxxxxxxxxxxx with your App ID from the Button Dashboard https://app.usebutton.com
[ButtonMerchant configureWithApplicationId:@"<#app-xxxxxxxxxxxxxxxx#>"];
[ButtonMerchant handlePostInstallURL:^(NSURL * _Nullable url, NSError * _Nullable error) {
if (url) {
// Route user to the url
}
}];
return YES;
}
NoteThe Button Merchant Library is disabled by default. No user activity is reported and no data is collected until configured with an application id. Initialization can be deferred by simply not calling this method until ready to do so.
Register Deep Links
Button’s Merchant Library will abstract any complexities of token management for you, including extracting the token from any incoming deeplinks.
For users that have already installed your application and are entering from another application’s promotion, Button’s Merchant library will help you source where they came from. Pass the incoming URL to the Button Merchant Library in order to accurately attribute and handle their intent.
The ButtonMerchant class allows you to handle both Universal Links by passing incoming user activity to trackIncomingUserActivity, and Custom Scheme URLs by passing incoming URLs to trackIncomingURL.
It is important that trackIncomingURL and trackIncomingUserActivity are called immediately. If the link that opens the app is not a Button Link, the Merchant Library will make this determination and Button will not be a part of the user journey.
NoteIf you are using scene delegates, incoming URLs will arrive in your SceneDelegate (i.e.
UIWindowSceneDelegate) instead of yourUIApplicationDelegate.
// Handle custom scheme urls
func application(_ app: UIApplication, open url: URL,
                 options: [UIApplicationOpenURLOptionsKey: Any] = [:]) -> Bool {

	ButtonMerchant.trackIncomingURL(url)

	// Your normal deep link route handling to show the user the content

	return true
}

// Handle Universal Links
func application(_ application: UIApplication, continue
                 userActivity: NSUserActivity,
                 restorationHandler: @escaping ([Any]?) -> Void) -> Bool {

  ButtonMerchant.trackIncomingUserActivity(userActivity)

   // Your normal deep link route handling to show the user the content

  return true
}
// Handle when the app is launched by a deeplink:
func scene(_ scene: UIScene, willConnectTo
session: UISceneSession,
options connectionOptions: UIScene.ConnectionOptions) {
// Handle custom scheme urls
if let url = connectionOptions.urlContexts.first?.url {
ButtonMerchant.trackIncomingURL(url)
}
// Handle Universal Links
if let url = connectionOptions.userActivities.first?.webpageURL {
ButtonMerchant.trackIncomingUserActivity(userActivity)
}
}
// Handle incoming deeplinks when the app is already running:
// Handle custom scheme urls
func scene(_ scene: UIScene, openURLContexts
URLContexts: Set<UIOpenURLContext>) {
guard let url = URLContexts.first?.url else { return }
ButtonMerchant.trackIncomingURL(url)
}
// Handle Universal Links
func scene(_ scene: UIScene, continue userActivity: NSUserActivity) {
ButtonMerchant.trackIncomingUserActivity(userActivity)
}// Handle custom scheme urls
- (BOOL)application:(UIApplication *)app
openURL:(NSURL *)url
options:(NSDictionary<UIApplicationOpenURLOptionsKey,id> *)options {
[ButtonMerchant trackIncomingURL:url];
return YES;
}
// Handle Universal Links
- (BOOL)application:(UIApplication *)application
continueUserActivity:(NSUserActivity *)userActivity
restorationHandler:(void (^)(NSArray * _Nullable))restorationHandler {
[ButtonMerchant trackIncomingUserActivity:userActivity];
return YES;
}Setup your Button Links domain
Xcode Entitlement
Button uses Universal Links to open your app from the Button Links domain.
If you have't already, enable the Associated Domains Capability and then add the following line to the list of domains.
applinks:yourdomain.bttn.io
NoteReplacing
yourdomain.bttn.iowith your Button Links domain
Button Dashboard Configuration
NoteThis step assumes you have completed Reserve your Link URL
Lastly, you’ll need to configure your App Site Association file and add your team identifier to the Button Dashboard.
- Navigate to the Button Dashboard Apps Section
- Choose your iOS app and click it's name to drill in.
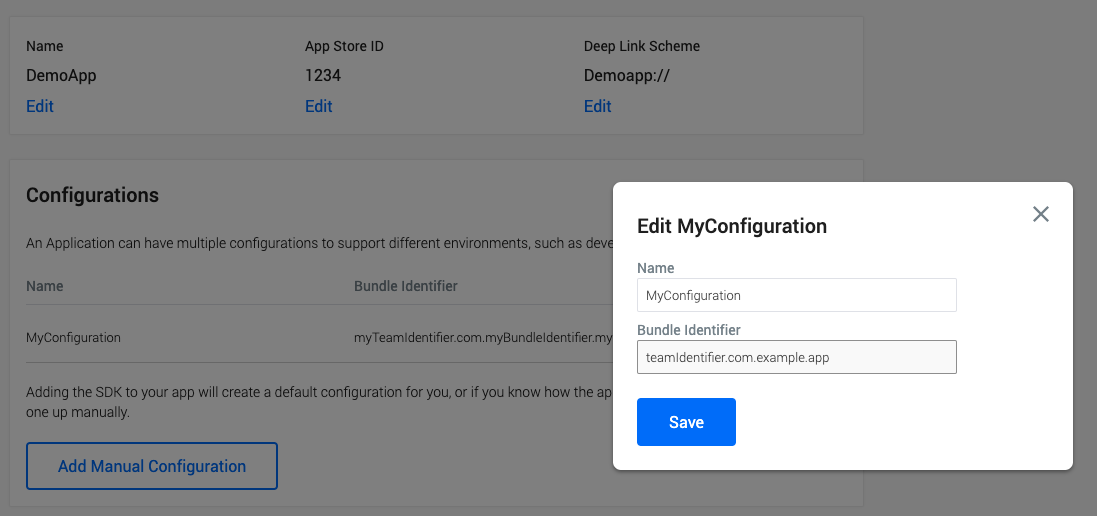
- Scroll down to the Configurations section and select Add Manual Configuration. If you've already added one, click Edit on the right side of that record.

<team_identifier>.com.example.app- Populate the Bundle Identifier including the Team Identifier as noted above.
Updated 8 months ago